Tunnel or Cistern at Kettleness Alum Works

Geotag Icon Show on map

This structure was unearthed by the York University Cave and Pothole Club back in 2006. They called it a mine and while there are jet mines below the Alum House, this is at a much higher level.

Kettleness Alum Works Tunnel / CisternKettleness Alum Works Tunnel / CisternKettleness Alum Works Tunnel / Cistern

To me the construction looks more like some sort of storage tank and it appears to end with a wall rather than a collapse. Also the suspended wooden planks which would allow access above the liquid below.

Return to Sandsend Tunnel

Geotag Icon Show on map

A long overdue return with a decent torch and decent camera.

The Kettleness portal is looking much closer to collapse than ever before, with a large amount of soil falling through from above and large stones hanging.

Sandsend Tunnel Collapsing Portal Sandsend Tunnel Collapsing Portal

Although once inside this end of the tunnel constructed from large blocks still looks very solid, although there was some bowing of the walls and collapsed layers of brick in certain areas towards the brick-built Sandsend end.

Sandsend Tunnel Sandsend Tunnel collapsing bricks

There are four ventilation shafts along the length of the tunnel, which seem to come in large and small varieties. All are capped, with fallen bricks and water cascading down them.

Sandsend Tunnel Ventilation Shaft Sandsend Tunnel Ventilation Shaft

Sandsend Tunnel Ventilation Shaft

There are two small side tunnels used in construction, which run from the bottom of air shafts, although both looked extremely muddy due to the water from the shafts so we didn’t venture down them.

Sandsend Tunnel Escape Tunnel Sandsend Tunnel Escape Tunnel

There are some impressive mineral formations lining the walls of the tunnel.

Sandsend Tunnel mineral formations Sandsend Tunnel mineral formations

Also stalactites growing from the roof.

Sandsend Tunnel stalactites Sandsend Tunnel stalactites

Dozens of alcoves line the full length of the tunnel, with the occasional bit of amusing graffiti.

Sandsend Tunnel Refuge Sandsend Tunnel Skeleton Grafitti

Exiting at the Sandsend portal is a small climb, although once you’re jumped over the wall there’s no easy way to go back.

Sandsend Tunnel Sandsend Tunnel


Return to Kettleness Railway Tunnel

Geotag Icon Show on map

After a years break I made a return to the Kettleness Tunnel to get a few more photos, the condition of the tunnel hasnt changed noticeably.

Kettleness Tunnel Kettleness Tunnel

We ventured into the small side tunnel used in construction about halfway along for the first time, after a short distance daylight becomes visible at the end.

Kettleness Tunnel Escape Tunnel Kettleness Tunnel Escape Tunnel Kettleness Tunnel Escape Tunnel

Theres an interesting variety of coloured minerals leaching through the brickwork in places.

Kettleness Tunnel mineral formations


Boulby Alum Works

Geotag Icon Show on map

The easiest way to avoid a plummet down the cliffs is to approach from Boulby and continue straight on where the Cleveland Way turns sharply uphill.

The first remains to be encountered are the foundations of a reservoir, theres also a large metal tub, although I cannot say if its contemporary.

Boulby Alum Works Boulby Alum Works Boulby Alum Works metal container

Adjacent to this is a small length of tunnel which has collapsed a short way in.

Boulby Alum Works Tunnel Boulby Alum Works Tunnel Boulby Alum Works Tunnel

All over the site are numerous smaller conduits that must have been used to move liquids around.

Boulby Alum Works Culvert Boulby Alum Works CulvertBoulby Alum Works Culvert

The path then passes directly between the bases of two circular cisterns.

Boulby Alum Works Cistern

Up towards the base of the cliffs the top of a short waterlogged tunnel can be seen to the right of a retaining wall, this only travels through the bank and appears to be for drainage.

Boulby Alum Works Retaining Wall and Cliff Boulby Alum Works Flooded Tunnel Boulby Alum Works Flooded Tunnel

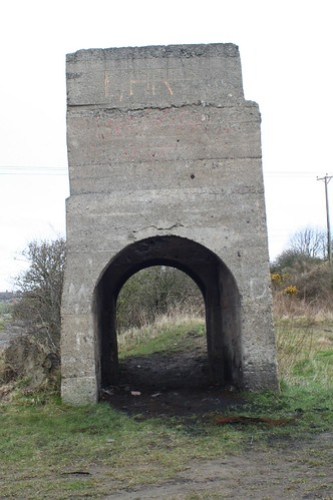
The next area you come across is the series of huge stone retaining walls visible from the top of the cliffs on the Cleveland Way.

Boulby Alum Works Retaining Walls Boulby Alum Works Retaining Walls Boulby Alum Works Retaining Walls Boulby Alum Works Retaining Walls Boulby Alum Works Retaining Walls

Huge boulders from the cliffs litter the area above the works.

Boulby Alum Works Cliff Collapse

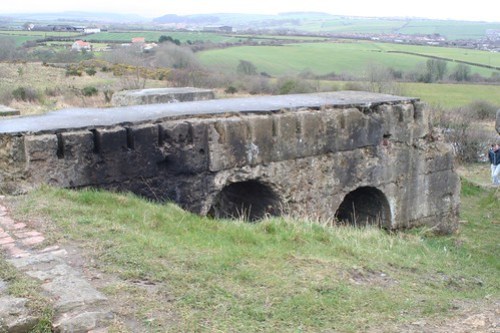
Two small tunnels can be seem running through the remains of the alum clamps where the stone was burnt for months on end, it has been suggested they were to aid the process.

Boulby Alum Works Tunnels Boulby Alum Works Tunnel Boulby Alum Works Tunnel

Towards the edge of the cliff a tunnel runs around an area of an old landslip re-emerging some distance away, The regular blocks suggest some sort of trough or conduit was originally present.

Boulby Alum Works Tunnel Boulby Alum Works Tunnel Boulby Alum Works Tunnel

A smaller conduit joins the tunnel at one point, and somewhat mysteriously a pretty teapot sits in one corner.

Boulby Alum Works Tunnel Side Passage Boulby Alum Works Tunnel Teapot

Lumpsey Ironstone Mine

Geotag Icon Show on map

The shaft at Lumpsey were started in early 1880 and stuck the ironstone seam 175m down in late 1881.

The mine operated through to November 1954, the majority of the building were demolished around 1964.

Both capped shafts are marked with a pillar and have an inscription (at least a welded one)
Lumpsey Ironstone Mine Shaft
Lumpsey Ironstone Mine Shaft and Fanhouse
Lumpsey Ironstone Mine Shaft

Between the two shafts are the sizeable brick foundations of a steam pumping engine.

Lumpsey Ironstone Mine Pumping Engine
Lumpsey Ironstone Mine Pumping Engine and Shaft
Lumpsey Ironstone Mine Pumping Engine

The circular opening of the Waddle fan house is still visible, although perhaps not for much longer as comparing with pictures from a couple of years ago the top has recently broken.

Lumpsey Ironstone Mine Fanhouse

The largest mass of remains are the concrete foundations of the main winding house.
Lumpsey Ironstone Mine Winding House
Lumpsey Ironstone Mine
Lumpsey Ironstone Mine Winding House

Slightly to the south of the winding house foundations are four concrete blocks which supported steam driven electricity generators.

Lumpsey Ironstone Mine Power Station Bases

A small tower which supported a weighbridge stands between the downcast shaft and the railway line.
Lumpsey Ironstone Mine Weightbridge Support

There are many other fragments of buildings and foundations scattered around in the undergrowth.
Lumpsey Ironstone Mine

Aysdalegate Ironstone Mine

Geotag Icon Show on map

The shaft at Aysdalegate was sunk some time around 1868, with the mine operating until 1880. A branch of the railway ran in front of the buildings to allow loading.

The mine buildings have since been converted into residental houses, although the small central window in the last house shows this was once a winding house.

Aysdalegate Buildings Aysdalegate Winding House

A capped shaft acts as roundabout in front of the winding house.

Aysdalegate Shaft 


Wilton Woods, Auxiliary Unit OB

Geotag Icon Show on map

The Auxiliary Units were to be Britains own resistance should a German invasion have been successful.

Their existance was top secret and only acknowledged by the government in the 1990s.

Little remains of this local “OB” or Operational Base except a few depressions in the ground which become covered in wild garlic most of the year,

Wilton Woods Auxiliary Unit OB 5 Wilton Woods Auxiliary Unit OB 4 Wilton Woods Auxiliary Unit OB 3 Wilton Woods Auxiliary Unit OB 1

There is an excellent diagram by David Waller that lets you relate to what’s still visible.

Wiltonobsml

Its most easily located by walking to the end of the promentary above where two stream meet.


Kettleness Ironstone Drift

Despite being on the same level as Cat Beck trial and only about 500m away getting to this one is a real challenge, it opens out below the edge of the cliffs, a climb down would be very risky and the climb from below is challenging and covered in brambles already, later in the year gardening gloves and very thick trousers would be in order.

The difficulty of access is reflected in there being only empty beercan in the drift (regulars of this sort of thing will know you cannot usually move for them)
The drift goes into the cliff before reaching a T-junction perhaps 25m in.

Kettleness Ironstone Drift Kettleness Ironstone Drift

To the right there is fair bit of collapsed roof which quickly leads to what looks like a purposefully filled face, the abandonment plan for this mine show the major continuation of the mine back towards the inland shaft to be in this direction

Kettleness Ironstone Drift Kettleness Ironstone Drift

Turning around and going back to the left at the T-junction there is a much longer section of drift, which has a slight dog-leg

Kettleness Ironstone Drift Kettleness Ironstone Drift

It continues for about the same distance again after the dog-leg at which point there are some pretty large roof-falls after which the tunnel looks to come to an end (although I didn’t fancy climbing over as there were large cracks in the ceiling)
Kettleness Ironstone Drift  Kettleness Ironstone Drift

Here are a couple of photos from the entrance.

View from entrance of Kettleness Ironstone Drift View from entrance of Kettleness Ironstone Drift

Cat Beck Ironstone Trial Drift

The entrance to the Cat Beck trial drift can be seen from the Cleveland Way.

Cat Beck Entrance

Upon entering the drifts are flooded to above wellington height.

Heading to the North West is a small drift less than 10m long

Cat Beck Ironstone Drift

Another drift of a similar length runs off West

Cat Beck Ironstone Drift

A much more sizeable drift perhaps 40m runs off to the South West, although we were unable to explore due to the depth of water

Cat Beck Ironstone Drift